目次
StatefullWidgetを作る(クラス名はAnimateにしました)
動画は最下部にあります!!
Animateクラス
class Animate extends StatefulWidget {
  @override
  _AnimateState createState() => _AnimateState();
}

class _AnimateState extends State<Animate> {
  Color _color = Colors.blue[100];
  double _width = 100;
  double _height = 100;

  @override
  Widget build(BuildContext context) {
    return Scaffold(
      appBar: AppBar(
        title: Text('アニメーション'),
      ),
      body: AnimatedContainer(
        color: _color,
        duration: Duration(seconds: 1),
        width: _width,
        height: _height,
      ),
      floatingActionButton: FloatingActionButton(
          onPressed: () => setState(() => (_color == Colors.blue[100])
              ? change()
              : remove())),
    );
  }

  void change() {
    _color = Colors.blue[600];
    _width = 300;
    _height = 300;
  }
  void remove() {
    _color = Colors.blue[100];
    _width = 100;
    _height = 100;
  }
}
解説
_AnimateState内で変更したい要素を変数で定義。
今回は、colorとwidthとheight。
AnimatedContainer()内で、colorとwidthとheightを指定する。
class _AnimateState extends State<Animate> {
  Color _color = Colors.blue[100];
  double _width = 100;
  double _height = 100;

  @override
  Widget build(BuildContext context) {
    return Scaffold(
      appBar: AppBar(
        title: Text('アニメーション'),
      ),
      body: AnimatedContainer(
        color: _color,
        duration: Duration(seconds: 1),
        width: _width,
        height: _height,
      ),
Scaffold()で、floatingActionButton: を設ける。
onPressed: にifとメソッドを仕込む。
body: AnimatedContainer(
        color: _color,
        duration: Duration(seconds: 1),
        width: _width,
        height: _height,
      ),
      floatingActionButton: FloatingActionButton(
          onPressed: () => setState(() => (_color == Colors.blue[100])
              ? change()
              : remove())),
    );
  }

  void change() {
    _color = Colors.blue[600];
    _width = 300;
    _height = 300;
  }
  void remove() {
    _color = Colors.blue[100];
    _width = 100;
    _height = 100;
  }
floatingActionButtonを押した時。
もし、_color=Colors.blue[100]ならchange()メソッドが走り、各プロパティが変更されアニメーションが実現される。
もし、_color=Colors.blue[100]でなかったらremove()メソッドが走り、各プロパティが元に戻りアニメーションが実現される。
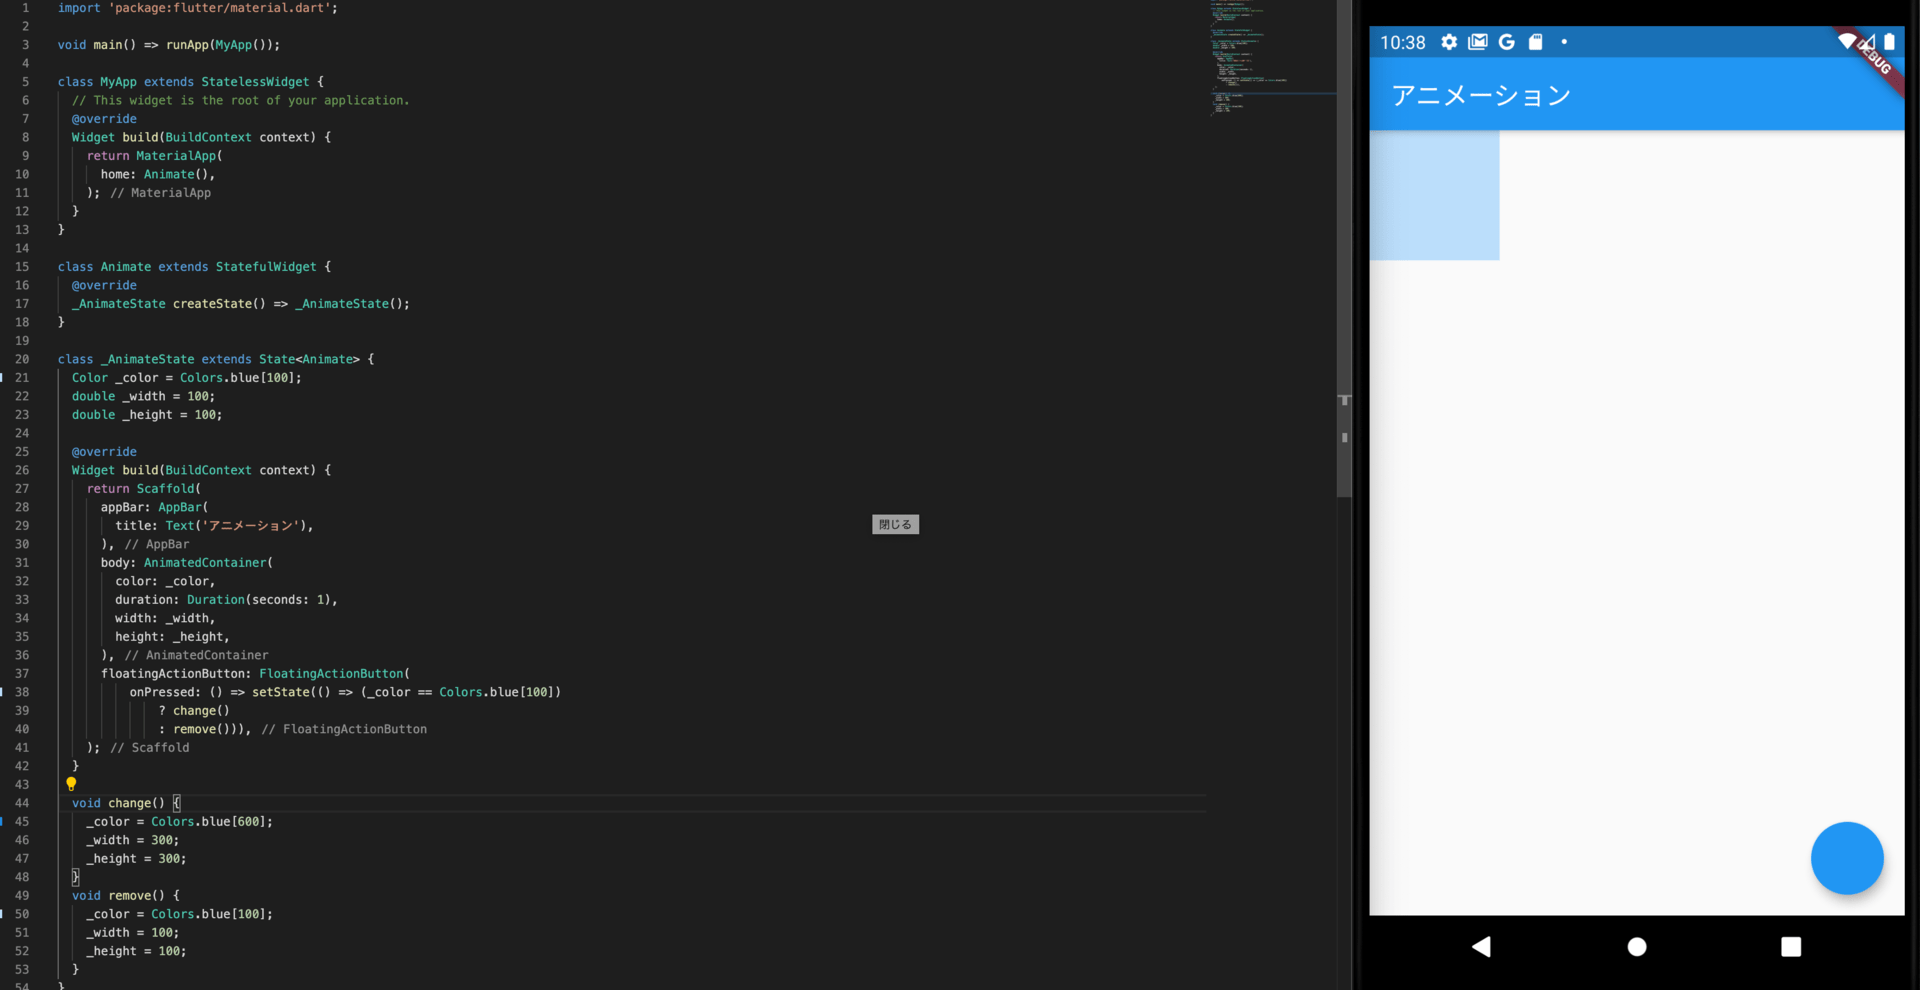
main.dartファイル全て
import 'package:flutter/material.dart';

void main() => runApp(MyApp());

class MyApp extends StatelessWidget {
  // This widget is the root of your application.
  @override
  Widget build(BuildContext context) {
    return MaterialApp(
      home: Animate(),
    );
  }
}

class Animate extends StatefulWidget {
  @override
  _AnimateState createState() => _AnimateState();
}

class _AnimateState extends State<Animate> {
  Color _color = Colors.blue[100];
  double _width = 100;
  double _height = 100;

  @override
  Widget build(BuildContext context) {
    return Scaffold(
      appBar: AppBar(
        title: Text('アニメーション'),
      ),
      body: AnimatedContainer(
        color: _color,
        duration: Duration(seconds: 1),
        width: _width,
        height: _height,
      ),
      floatingActionButton: FloatingActionButton(
          onPressed: () => setState(() => (_color == Colors.blue[100])
              ? change()
              : remove())),
    );
  }

  void change() {
    _color = Colors.blue[600];
    _width = 300;
    _height = 300;
  }
  void remove() {
    _color = Colors.blue[100];
    _width = 100;
    _height = 100;
  }
}